This isn't a step-by-step writeup - I didn't photograph each step, so you'll have to fill in some of the blanks yourselves if you want to make something like this. You'll also need access to a laser cutter to make the diffusers.
I thought about using an Arduino or Pico, but decided there was little to be gained, so the design just uses resistors, switches and LEDs.
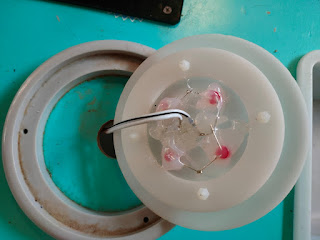
Each ring uses 4 super-bright red LEDs behind a laser-cut arrangement of pearlescent acrylic. This gives a very pleasing and scarily realistic effect.
You can also see a video of it in action here. The idea is that the controls are pots with a built-in switch, so that when you turn them a bit, they click on and the hob lights up dimly as if the ring is just on. As you turn the knob more clockwise the brightness increases to a maximum.
To make this I used:
- 2 x 1kΩ 1/4W linear pot with SPST switch (from eBay)
- 2 x large knobs to fit the above
- 2 x 470Ω 1/4W resistors
- 8 x high brightness red LEDs (Vf 2.2V If 20mA)
- 3xAA 4.5V batter box
- 2 x A4 sheets of 3mm pearlescent acrylic
Here's the schematic for one of the rings. If you find you have a lower Vf for your LEDs then you will need to add a suitable fixed resistor in series with the 4.5V supply and the pot. 100Ω should cover most eventualities. You will need to get the pot the right way around, so that when you first turn the knob a bit and the switch closes, you will effectively have the full 1k of the pot in parallel with the 470Ω resistor. At the far end of the travel, the pot resistance will be close to 0Ω, for maximum brightness.
And here's a closup of the back of one of the rings showing a healthy amount of hot-glue keeping everything in place.
Here are the laser cutting files, should you wish to adapt the design to you own kitchen.
https://github.com/simonmonk/toy_kitchen_upgrade
I had fun making this, and grandchild number one love it!


No comments:
Post a Comment